Sending Commands to an Arduino (or other IoT device)
While much traffic in the internet of things, is device-to-cloud, sometimes it is important to send data from the cloud to an IoT device. In Assetwolf we call this a Command.
Simple, Pre-formatted and Raw JSON Commands
There are three kinds of Command:
- Simple
- Pre-formatted
- Raw JSON.
With a Simple command, the Superuser sets up a template for what to send, so that the more junior user who sends the actual command has a simple interface.
With Pre-formatted Commands, there is a screen in which a Superuser can define a number of fields, and make a user-friendly "form" for the eventual user to use. The form will contain placeholders, and the eventual command will be sent in JSON. Raw JSON Commands are intended for more advanced users (e.g. maintenance engineers), as the sending user will specify the complete JSON string to send to the device.
 This article just covers Simple Commands, please see a later article on Pre-formatted and Raw JSON Commands.
Simple Commands have two parts:
- the Command definition screen
- the Command-sending screen.
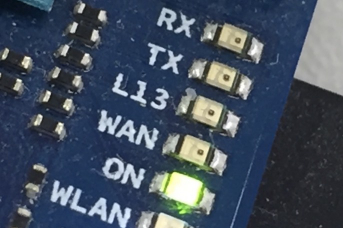
By the way, here is the Arduino with the red light turned off:
Defining a Simple Command
To define a Simple Command, first select an asset type, and then select Commands.
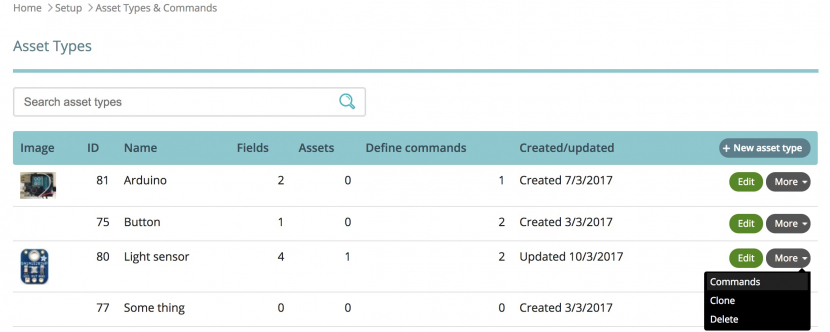
You'll then see a list of Commands for that Asset Type, and there should be a +New command button to define a new one.
Here's how it looks when you edit a simple command, in this example to turn a light on on an Arduino:
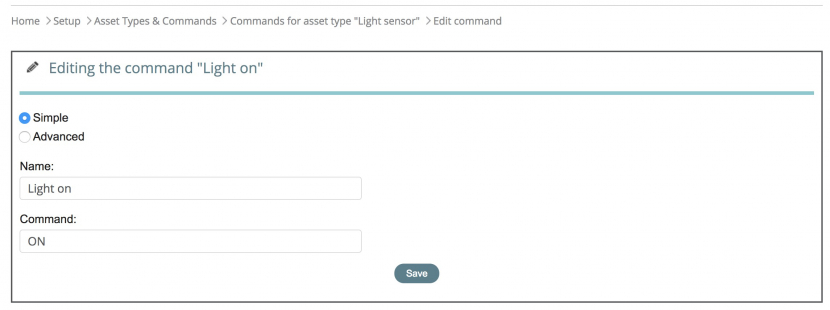
Give the Command a name, and enter "ON" as the text for the instruction to turn the Arduino lamp on. You can also create a similar Command with "OFF", to turn the lamp off.
What will the Command look like?
Here is how the above Command will appear:
ON
That's it! The word "ON" (or "OFF") is the entire payload.
Simple Commands just have a single string, and this is sent to the device when the Command is used.
Sending a Command
To send a Command, select the asset and look for Commands in the drop-down menu, or go to the view-asset screen, where you should see a drop-down menu of Simple Commands, like this:

 Select the command and press Send.
If you use the program shown below, in which the Arduino goes to sleep for several seconds and wakes from time to time, the command will be queued on Assetwolf until the Arduino comes online again. It will need to connect and publish some data, and will receive the Command to turn the light on when it does this.
This is a typical mode of operation for devices that need to save power (more on this in a moment).
If the device is on all the time, the data will be sent immediately.
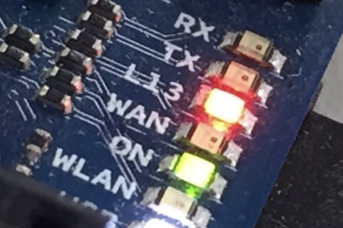
Here's the Arduino again, now with its red light turned on.
The Arduino code
Here's the Arduino code that we now run to make this happen.
/***************************************************
 Adafruit MQTT Library Arduino Yun Example

 Make sure your Arduino Yun is connected to a WiFi access point which
 has internet access.  Also note this sketch uses the Console class
 for debug output so make sure to connect to the Yun over WiFi and
 open the serial monitor to see the console output.

 Works great with the Arduino Yun:
 ----> https://www.adafruit.com/products/1498

 Adafruit invests time and resources providing this open source code,
 please support Adafruit and open-source hardware by purchasing
 products from Adafruit!

 Written by Tony DiCola for Adafruit Industries.
 MIT license, all text above must be included in any redistribution
****************************************************/
#include <Bridge.h>
#include <Console.h>
#include <BridgeClient.h>
#include "Adafruit_MQTT.h"
#include "Adafruit_MQTT_Client.h"
#include <ArduinoJson.h>

/************************* Adafruit.io Setup *********************************/

#define SERVER    "example.assetwolfportal.com"
#define PORT      1883
#define USERNAME  "username"
#define PASSWORD  "password"
#define DEVICE_ID "Xxs2h2"

/************ Global State (you don't need to change this!) ******************/

// Create a BridgeClient instance to communicate using the Yun's bridge & Linux OS.
BridgeClient client;

// Setup the MQTT client class by passing in the WiFi client and MQTT server and login details.
Adafruit_MQTT_Client mqtt(&client, SERVER, PORT, USERNAME, PASSWORD);

/****************************** Feeds ***************************************/

// Setup a feed called 'assetPub' for publishing.
// Notice MQTT paths for AIO follow the form: <username>/feeds/<feedname>
Adafruit_MQTT_Publish assetPub = Adafruit_MQTT_Publish(&mqtt, "up/client/" USERNAME "/asset/" DEVICE_ID);

// Setup a feed called 'assetSub' for subscribing to changes.
Adafruit_MQTT_Subscribe assetSub = Adafruit_MQTT_Subscribe(&mqtt, "down/client/" USERNAME "/asset/" DEVICE_ID);

/*************************** Sketch Code ************************************/

void setup() {
 Bridge.begin();
 Console.begin();
 Console.println(F("Assetwolf MQTT demo"));

 // Setup MQTT subscription for onoff feed.
 mqtt.subscribe(&assetSub);

 // initialize digital pin LED_BUILTIN as an output.
 pinMode(LED_BUILTIN, OUTPUT);
}

int sensorPin = A0;
String sPayload;
char* cPayload;

void loop() {
 // Ensure the connection to the MQTT server is alive (this will make the first
 // connection and automatically reconnect when disconnected).  See the MQTT_connect
 // function definition further below.
 MQTT_connect();

 analogReference(EXTERNAL);
 pinMode(13, OUTPUT);

 StaticJsonBuffer<200> jsonBuffer;
 JsonObject& payload = jsonBuffer.createObject();
 payload["device_id"] = DEVICE_ID;
 payload["lightlevel"] = analogRead(sensorPin);

 sPayload = "";
 payload.printTo(sPayload);
 cPayload = &sPayload[0u];

 // Now we can publish stuff!
 Console.print(F("\nPublishing "));
 Console.print(cPayload);
 Console.print("...");

 if (! assetPub.publish(cPayload)) {
   Console.println(F("Failed"));
 } else {
   Console.println(F("OK!"));
 }

 // this is our 'wait for incoming subscription packets' busy subloop
 Adafruit_MQTT_Subscribe *subscription;
 while ((subscription = mqtt.readSubscription(3000))) {
   if (subscription == &assetSub) {
     Console.print(F("Got: "));
     Console.println((char *)assetSub.lastread);

     if (strcmp((char *)assetSub.lastread, "ON") == 0) {
       digitalWrite(LED_BUILTIN, HIGH);
     }
     if (strcmp((char *)assetSub.lastread, "OFF") == 0) {
       digitalWrite(LED_BUILTIN, LOW);
     }

   }
 }

 // ping the server to keep the mqtt connection alive
 if(! mqtt.ping()) {
   Console.println(F("MQTT Ping failed."));
 }

 delay(90000);  // wait 90 seconds
}

// Function to connect and reconnect as necessary to the MQTT server.
// Should be called in the loop function and it will take care if connecting.
void MQTT_connect() {
 int8_t ret;

 // Stop if already connected.
 if (mqtt.connected()) {
   return;
 }

 Console.print("Connecting to MQTT... ");

 while ((ret = mqtt.connect()) != 0) { // connect will return 0 for connected
      Console.println(mqtt.connectErrorString(ret));
      Console.println("Retrying MQTT connection in 5 seconds...");
      mqtt.disconnect();
      delay(5000);  // wait 5 seconds
 }
 Console.println("MQTT Connected!");
}
The above code tells the Arduino to connect and subscribe to the relevant MQTT topic (which is a combination of the client username and the device ID). This happens in the setup() function.
Note that the code also gets the light level as per the previous article and publishes that data to the Assetwolf IoT server.
After publishing the data, it waits for 3 seconds (3000ms) for the server to send back a Command, if one is pending. If one arrives, it looks for the string ON or OFF and turns the red LED on or off accordingly.
Then there is a 90 second delay, after which the process repeats.
Low-power
In a real-world device in which power consumption must be kept low, the above routine allows you to send a command or some other data to a device that spends most of its time in standby mode and only wakes up from time to time.
This is good for keeping power consumption down, but does mean that outgoing data cannot usually be got to the device without some delay. But the above script could easily be adapted for something that is always-on.