Connect an Arduino to the IoT cloud using JSON and MQTT
Here's a simple project for you to try, showing a number of things:
- read in analog data (in this project we'll use a light level detector)
- connect to an MQTT broker in the cloud
- publish data in the form of a JSON object to the MQTT broker
- view the light-level data on an Assetwolf portal.
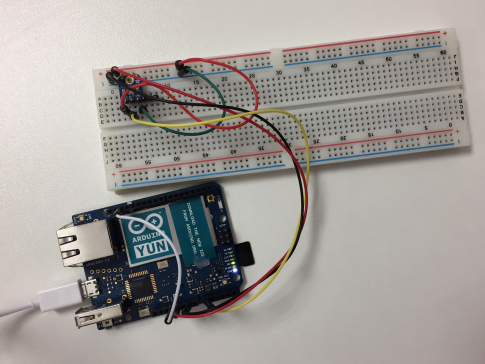 Here's how we put our simple system together.
Hardware
- Arduino Yún
- GA1A12S202 Log-scale Analog Light Sensor
- Breadboard and connector wires
Software
Online
- An Assetwolf portal. We connected up our Arduino, with it taking analog input from the light sensor, using its A/D converter to convert this to a number. (You might of course have other kinds of data input, but the light level is a simple example to explain the basics of sending such data to the IoT cloud).
We then created the following program in the Arduino IDE.
Arduino code
/***************************************************
 Adafruit MQTT Library Arduino Yun Example

 Make sure your Arduino Yun is connected to a WiFi access point which
 has internet access. Also note this sketch uses the Console class
 for debug output so make sure to connect to the Yun over WiFi and
 open the serial monitor to see the console output.

 Works great with the Arduino Yun:
 ----> https://www.adafruit.com/products/1498

 Adafruit invests time and resources providing this open source code,
 please support Adafruit and open-source hardware by purchasing
 products from Adafruit!

 Written by Tony DiCola for Adafruit Industries.
 MIT license, all text above must be included in any redistribution
 ****************************************************/
#include <Bridge.h>
#include <Console.h>
#include <BridgeClient.h>
#include "Adafruit_MQTT.h"
#include "Adafruit_MQTT_Client.h"
#include <ArduinoJson.h>

/************************* Assetwolf Portal Setup *********************************/

//Connection details found on the asset page
#define SERVER "example.assetwolfportal.com"
#define PORT 1883
#define USERNAME "username"
#define PASSWORD "password"
#define DEVICE_ID "Xxs2h2"

/************ Global State (you don't need to change this!) ******************/

// Create a BridgeClient instance to communicate using the Yun's bridge & Linux OS.
BridgeClient client;

// Setup the MQTT client class by passing in the WiFi client and MQTT server and login details.
Adafruit_MQTT_Client mqtt(&client, SERVER, PORT, USERNAME, PASSWORD);

/****************************** Feeds ***************************************/

// Setup a feed called 'assetPub' for publishing.
// Notice MQTT paths for Assetwolf follow the form: up/client/<username>/asset/<device_id>
Adafruit_MQTT_Publish assetPub = Adafruit_MQTT_Publish(&mqtt, "up/client/" USERNAME "/asset/" DEVICE_ID);

/*************************** Sketch Code ************************************/

void setup() {
    Bridge.begin();
    Console.begin();
    Console.println(F("Assetwolf MQTT demo"));
}

int sensorPin = A0;
String sPayload;
char* cPayload;

void loop() {
    // Ensure the connection to the MQTT server is alive (this will make the first
    // connection and automatically reconnect when disconnected). See the MQTT_connect
    // function definition further below.
    MQTT_connect();

    analogReference(EXTERNAL);
    pinMode(13, OUTPUT);

    StaticJsonBuffer<200> jsonBuffer;
    JsonObject& payload = jsonBuffer.createObject();
    payload["device_id"] = DEVICE_ID;
    payload["light_level"] = analogRead(sensorPin);

    sPayload = "";
    payload.printTo(sPayload);
    cPayload = &sPayload[0u];

    // Now we can publish stuff!
    Console.print(F("\nPublishing "));
    Console.print(cPayload);
    Console.print("...");

    if (! assetPub.publish(cPayload)) {
        Console.println(F("Failed"));
    } else {
        Console.println(F("OK!"));
    }

    // ping the server to keep the mqtt connection alive
    if(! mqtt.ping()) {
        Console.println(F("MQTT Ping failed."));
    }

    delay(5000);
}

// Function to connect and reconnect as necessary to the MQTT server.
// Should be called in the loop function and it will take care if connecting.
void MQTT_connect() {
   int8_t ret;

    // Stop if already connected.
    if (mqtt.connected()) {
        return;
    }

    Console.print("Connecting to MQTT... ");

    while ((ret = mqtt.connect()) != 0) { // connect will return 0 for connected
        Console.println(mqtt.connectErrorString(ret));
        Console.println("Retrying MQTT connection in 5 seconds...");
        mqtt.disconnect();
        delay(5000); // wait 5 seconds
    }
    Console.println("MQTT Connected!");
}
The code relies on the Adafruit MQTT library. The first few lines include the necessary libraries.
Next, the code specifies the connection parameters to the Assetwolf portal. The exercise can be undertaken with a free portal, and in the above example uses the non-secure connection, so that the Arduino can connect to port 1883 of the MQTT broker.
In the Feeds section, notice how the Arduino will connect to a topic of the form: up/client/USERNAME/asset/DEVICE_ID. Although the device ID must be, it will need to be repeated in each message's dataframe.
In the main Sketch, the setup() function is short, and basically just initialises things by running once. The loop() function does most of the work and is called over and over. It starts by reading in the analog light level value, and compiles the payload. It publishes this to the MQTT broker, then finally does a 5 second delay.
Setting up the asset on Assetwolf
Step 1 - Create an Asset Type with some fields for data
You first need to create an Asset Type. You should be taken straight to this screen after your portal is created but you can always make more by looking for Asset Types under the Setup menu.
This is the generic type of "thing" you'll be connecting. We'll make one called "Simple light sensor". Since we want to receive the light level from our Arduino we'll make a field under the "Incoming data from asset" section. We will call it light_level (to our payload parameter in the code above).
Your asset type should look like this:
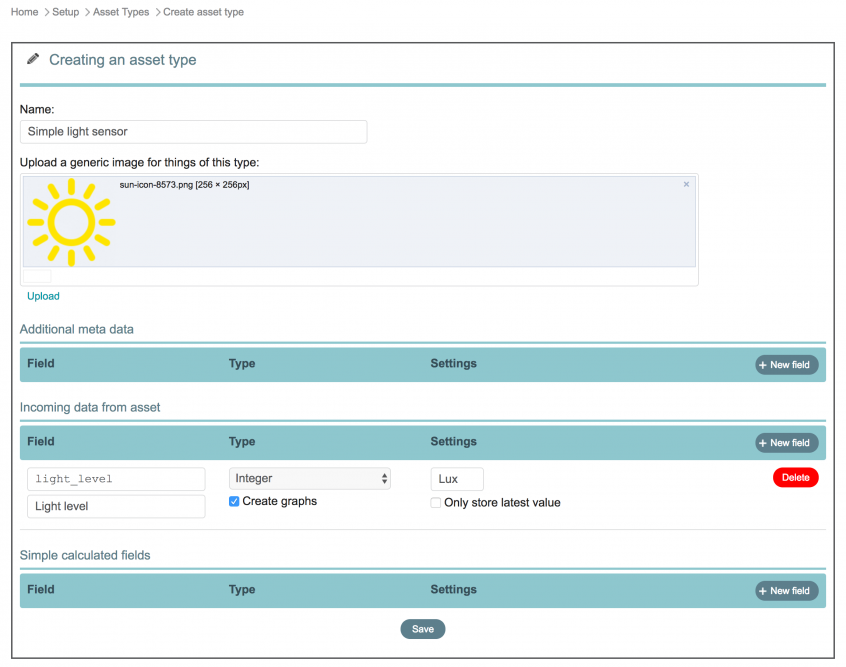
Then click Save.
Step 2 - Create your asset
Now we can create light sensors! Create one from your dashboard and give it a Device ID (a unique identifier for this Arduino).
The screen to create the asset should look like this:
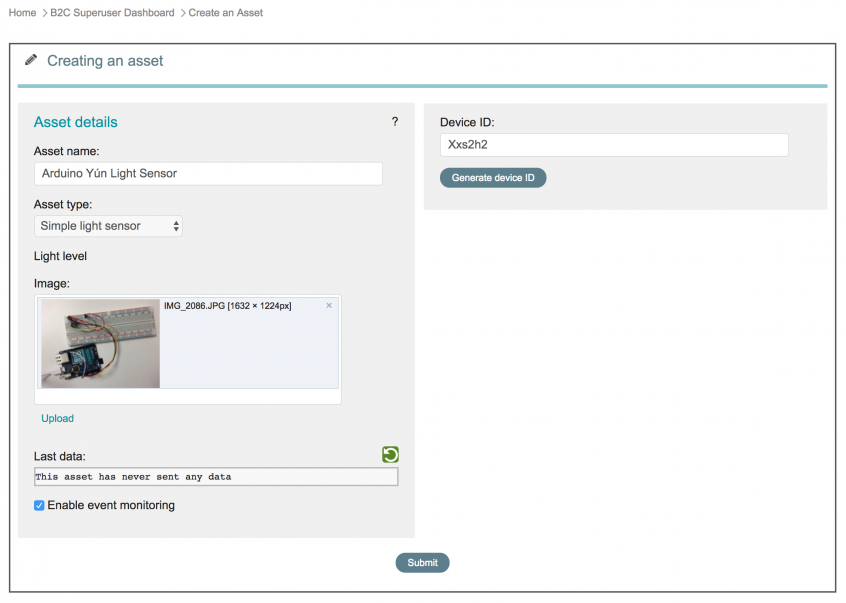
It's important that the asset type is set to "Simple light sensor" and that the Device ID matches the one in the Arduino program.
When you're done, click Save.
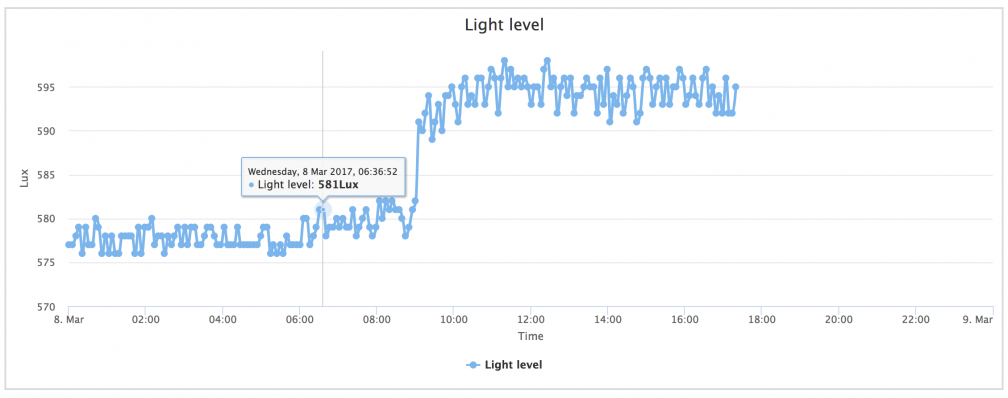
Step 3 - Watch your data on the Portal
Send your Arduino code to your Arduino and make sure it is running. If the connection parameters are correct, the IoT portal should start receiving data immediately.
You can see the light level graph from the Asset detail page, where the standard portal should show you a list of fields. Click the light_level field to see its graph.
Heres an example from one running in our office.
Your turn!
The above example ought to work on any Arduino Yun, and with minor modifications on other Arduino's (possibly you may need to add libraries for network shields or other connectivity).
We hope you enjoy it! To try this yourself, create an portal here.